Battery switch on travel trailer function is crucial for managing your RV’s power. This guide breaks down everything you need to know about these switches, from understanding their different types and how they work to troubleshooting common problems and ensuring safe operation. We’ll cover connecting and disconnecting batteries, maintaining your switch, and even choosing the right battery for your needs.
Get ready to become a battery switch expert!
We’ll explore the inner workings of single, dual, and selector switches, providing step-by-step instructions on how to use them safely and effectively. Learn about preventative maintenance, troubleshooting tips for common issues, and how to integrate your battery switch with other parts of your travel trailer’s electrical system. This isn’t just about flipping a switch; it’s about understanding your RV’s power system and keeping it running smoothly.
Battery Switch and Electrical System Integration

The battery switch is a crucial component in your travel trailer’s electrical system, acting as a central control point for power distribution. Understanding its role and how it interacts with other elements is essential for safe and efficient operation. This section will detail the battery switch’s relationship with the converter, inverter, shore power, and charging system, explaining its impact on battery life and comparing different switch configurations.The battery switch manages the flow of electricity from your trailer’s batteries to the various appliances and systems.
It works in conjunction with other parts of your electrical system, creating a network that powers your lights, water pump, refrigerator, and other devices, both on and off the grid. The effectiveness of this system relies heavily on the proper functioning of the battery switch.
So, you’re planning a trip? Awesome! First things first, grab some peace of mind with travel insurance. Check out Aon travel insurance for options. Then, if you’re hitting the road in an RV, knowing how the battery switch on travel trailer function works is crucial. It’ll save you a lot of headaches down the line, trust me! Make sure you understand your insurance coverage before you go, and familiarize yourself with your RV’s systems.
Happy travels!
Battery Switch Interaction with Other Electrical Components
The battery switch acts as a gatekeeper for power from your house batteries. When the switch is “on,” power from the batteries flows to the trailer’s 12-volt DC system, supplying power to appliances and systems directly connected to the battery bank. When connected to shore power (mains electricity), the converter transforms the 120-volt AC power into 12-volt DC power to charge the batteries and also power the 12-volt DC system.
The inverter converts 12-volt DC power from the batteries into 120-volt AC power for appliances requiring AC power. With the battery switch “off,” the batteries are disconnected from the rest of the system, preventing accidental discharge or drain. This is crucial for preventing the batteries from completely discharging, which could damage them.
So, you’re planning a trip? Awesome! First things first: get travel insurance. Check out Aon travel insurance for some solid options; they’ve got you covered for most eventualities. Then, if you’re hitting the road in an RV, understanding your battery switch on travel trailer function is key to avoiding a dead battery and a ruined vacation.
Knowing how to manage your power is just as important as having good insurance!
Battery Switch and Charging System Impact on Battery Life
The battery switch plays a significant role in optimizing battery life. When the switch is off, it isolates the batteries, preventing parasitic drains from things like clocks or low-power devices that continuously draw power even when the trailer is not in use. This prevents the batteries from slowly discharging over time. However, leaving the switch off also means the batteries won’t charge when connected to shore power.
Proper use involves turning the switch on when charging is needed and off when the trailer is stored or unused for extended periods. Regular charging, managed via the converter and facilitated by the battery switch, is key to maintaining battery health and extending their lifespan. Overcharging or deep discharging can significantly reduce battery life.
Comparison of Battery Switch Configurations
Several battery switch configurations exist, each with advantages and disadvantages. A simple on/off switch is the most basic, offering simple control but limited flexibility. More advanced switches, such as those with multiple positions, allow for connecting multiple battery banks or isolating specific batteries for maintenance. Some switches incorporate a disconnect function for safety and security, while others offer remote control options for added convenience.
The choice depends on your trailer’s setup, the number of batteries, and your specific needs. For instance, a dual-battery setup with a switch allowing for individual battery selection offers more control and can prolong the lifespan of the batteries by allowing you to use one bank while charging the other. A simple on/off switch in a single battery setup is adequate for basic functionality.
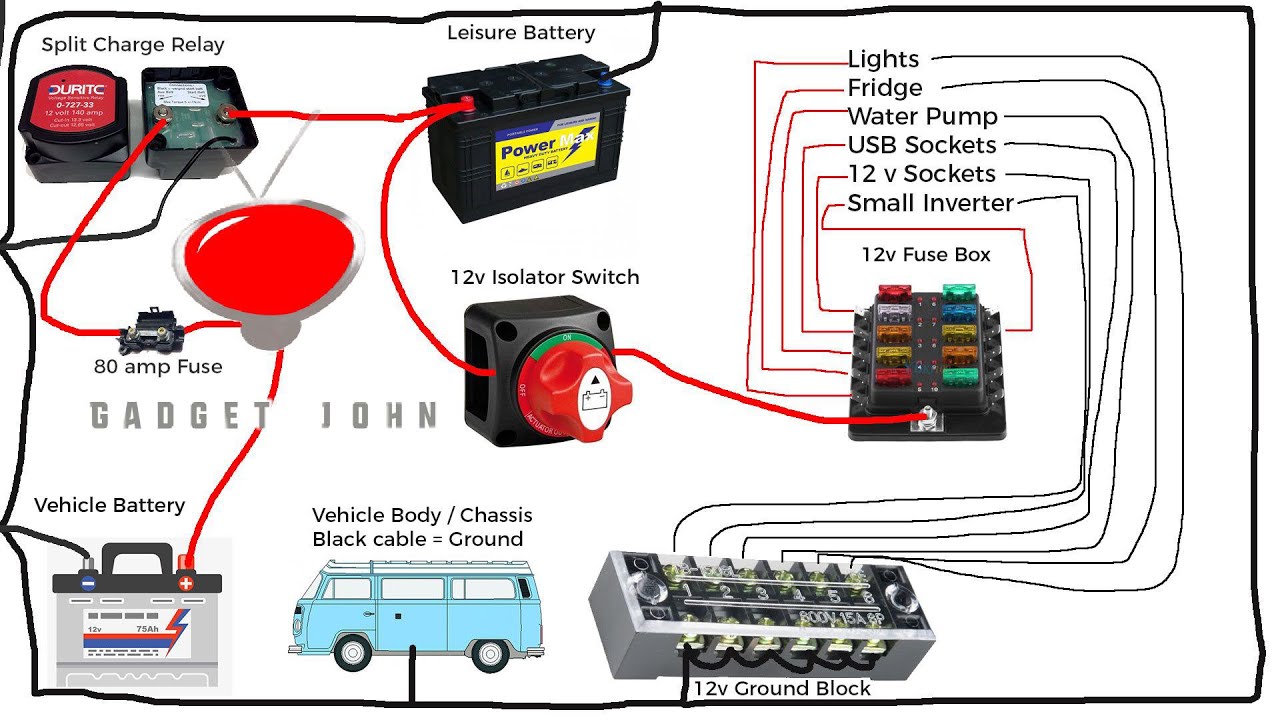
Diagram of Electricity Flow
Imagine a simple diagram. On one side, we have the shore power connection. This power flows to the converter, which converts it to 12V DC. This 12V DC then flows to both the 12V DC system of the trailer and to the batteries. The battery switch sits between the batteries and the 12V DC system.
When the switch is ON, the 12V DC flows from the batteries to the 12V DC system, supplementing or powering it directly. The inverter converts 12V DC from the batteries (or the converter) to 120V AC for AC appliances. When the switch is OFF, the batteries are isolated from the 12V DC system, preventing drain. The 12V DC system is then powered solely by the converter.
This illustration highlights the crucial role of the battery switch in managing power flow and protecting the batteries.
Battery Switch Maintenance and Replacement: Battery Switch On Travel Trailer Function
Keeping your travel trailer’s battery switch in top condition is crucial for reliable power. Regular maintenance prevents costly repairs and ensures you’re always ready for your next adventure. Neglecting this simple component can lead to frustrating breakdowns far from home. This section details a maintenance schedule and the process for replacing a faulty switch.
Routine Maintenance Schedule, Battery switch on travel trailer function
A simple, regular maintenance schedule will significantly extend the life of your battery switch and associated wiring. This involves visual inspections and cleaning, ensuring everything is in good working order. Ignoring these simple steps can lead to corrosion and premature failure.
- Monthly Inspection: Visually inspect the battery switch for any signs of corrosion, loose connections, or damage to the switch itself. Look for any white powdery substance or greenish discoloration around the terminals, indicating corrosion. Check the tightness of all connections.
- Semi-Annual Cleaning: Use a wire brush or a battery terminal cleaner to remove any corrosion from the battery terminals and the switch terminals. Apply a corrosion inhibitor to the cleaned terminals to prevent future corrosion.
- Annual Thorough Check: Beyond cleaning, this check involves verifying the switch’s proper operation. Turn the switch on and off several times, ensuring smooth operation and that there are no sparks or unusual noises. Check all wiring connections for tightness and signs of wear. This is a good time to test the amperage draw of the system to ensure there are no hidden problems.
Preventing Corrosion
Corrosion is the biggest enemy of your battery switch and related components. Moisture and exposure to the elements accelerate corrosion, leading to poor connections and eventual failure. Taking proactive steps can significantly reduce this risk.
- Keep it Dry: Protect the battery switch and wiring from rain and moisture as much as possible. Consider using a waterproof cover or sealant, especially if your switch is exposed to the elements.
- Apply Corrosion Inhibitor: Regularly applying a dielectric grease or corrosion inhibitor to the terminals creates a protective barrier against moisture and oxidation. This is a simple yet highly effective preventative measure.
- Proper Ventilation: Ensure good airflow around the battery and switch to prevent the buildup of moisture and corrosive gases. Avoid enclosing the battery in a poorly ventilated compartment.
Battery Switch Replacement Procedure
Replacing a faulty battery switch is a relatively straightforward process, but safety precautions are essential. Always disconnect the battery’s negative terminal before working on any electrical components.
- Disconnect the Battery: Disconnect the negative (-) terminal of your travel trailer battery. This is the most crucial safety step to prevent accidental shocks or short circuits.
- Remove the Old Switch: Carefully disconnect the wires from the old battery switch. Take note of which wire goes to which terminal. Use a wrench or pliers to remove the switch from its mounting location. Take pictures if necessary to aid in reassembly.
- Install the New Switch: Mount the new switch in the same location as the old switch. Connect the wires to the correct terminals, matching them to your notes or pictures.
- Reconnect the Battery: Reconnect the negative (-) terminal of your battery. Turn the switch on and check for proper operation. Verify all lights and appliances work as expected.
Tools and Materials Needed for Replacement
Before starting the replacement, gather the necessary tools and materials. Having everything ready beforehand makes the process much smoother and safer.
- New battery switch (ensure it’s the correct amperage rating for your system)
- Wrench or pliers (appropriate size for the switch terminals)
- Wire brush or battery terminal cleaner
- Dielectric grease or corrosion inhibitor
- Screwdriver (if necessary for mounting the switch)
- Multimeter (optional, for testing the switch after installation)
Safety Considerations When Using the Battery Switch
Operating your travel trailer’s battery switch incorrectly can lead to serious consequences, from minor inconveniences to significant safety hazards. Understanding the potential risks and following proper safety procedures is crucial for preventing accidents and ensuring the longevity of your electrical system. This section details the essential safety precautions you should always observe.
Potential Hazards of Incorrect Battery Switch Operation
Improper use of the battery switch can result in several dangerous situations. Connecting or disconnecting the battery while appliances are running can cause voltage spikes, potentially damaging sensitive electronics or even starting a fire. Furthermore, accidentally touching exposed wires or terminals while the battery is connected can lead to electric shock, which can be life-threatening. Leaving the battery switch in the “on” position while the trailer is stored for extended periods can drain the battery, leading to premature failure or even corrosion.
Conversely, leaving the switch in the “off” position while you need power will obviously leave you without electricity.
Safety Guidelines for Working with Travel Trailer Electrical Systems
Always disconnect the battery using the battery switch before performing any maintenance or repairs on the electrical system. This isolates the system, preventing accidental shocks or short circuits. Wear appropriate safety glasses to protect your eyes from sparks or flying debris. Use insulated tools to prevent accidental contact with live wires. Never work on the electrical system in wet or damp conditions, as this increases the risk of electric shock.
If you are unsure about any aspect of the electrical system, consult a qualified RV technician.
Importance of Proper Grounding and Bonding
Proper grounding and bonding are essential for the safe operation of your travel trailer’s electrical system, and are directly related to the battery switch. Grounding provides a path for stray electrical currents to safely flow back to the earth, preventing voltage buildup and shocks. Bonding connects various metal parts of the trailer together, ensuring that they are all at the same electrical potential and reducing the risk of stray currents causing problems.
A properly grounded and bonded system, controlled by the battery switch, minimizes the chance of electrical shocks and fire hazards. A faulty grounding system, however, can cause serious problems when the battery switch is activated.
Isolating the Battery System Before Maintenance or Repairs
Before undertaking any maintenance or repairs on your travel trailer’s electrical system, always isolate the battery system by turning the battery switch to the “off” position. This will completely disconnect the battery from the rest of the system. After turning the switch off, wait for a few minutes to allow any residual charge to dissipate before beginning any work.
Confirm the system is completely dead by using a non-contact voltage tester on the relevant wires. Once the work is completed, carefully reconnect the battery using the battery switch.
Mastering your travel trailer’s battery switch is key to enjoying worry-free adventures. By understanding its function, performing routine maintenance, and knowing how to troubleshoot common problems, you’ll keep your RV powered up and ready for anything. Remember safety first! Always disconnect the battery before performing any maintenance or repairs. With a little knowledge and attention, your battery switch will serve you reliably for years to come, ensuring your off-grid adventures are always powered up.
FAQ Resource
What happens if my battery switch is stuck?
Try lubricating the switch mechanism with a penetrating lubricant. If that doesn’t work, the switch may need replacement.
How often should I clean my battery terminals?
Clean your battery terminals at least twice a year, or more often if you notice corrosion.
Can I use any type of battery with my travel trailer?
Check your owner’s manual for compatible battery types. Using an incompatible battery can damage your electrical system.
What’s the difference between a single and dual battery switch?
A single switch controls one battery, while a dual switch allows you to control two batteries separately or together.
